Introduction
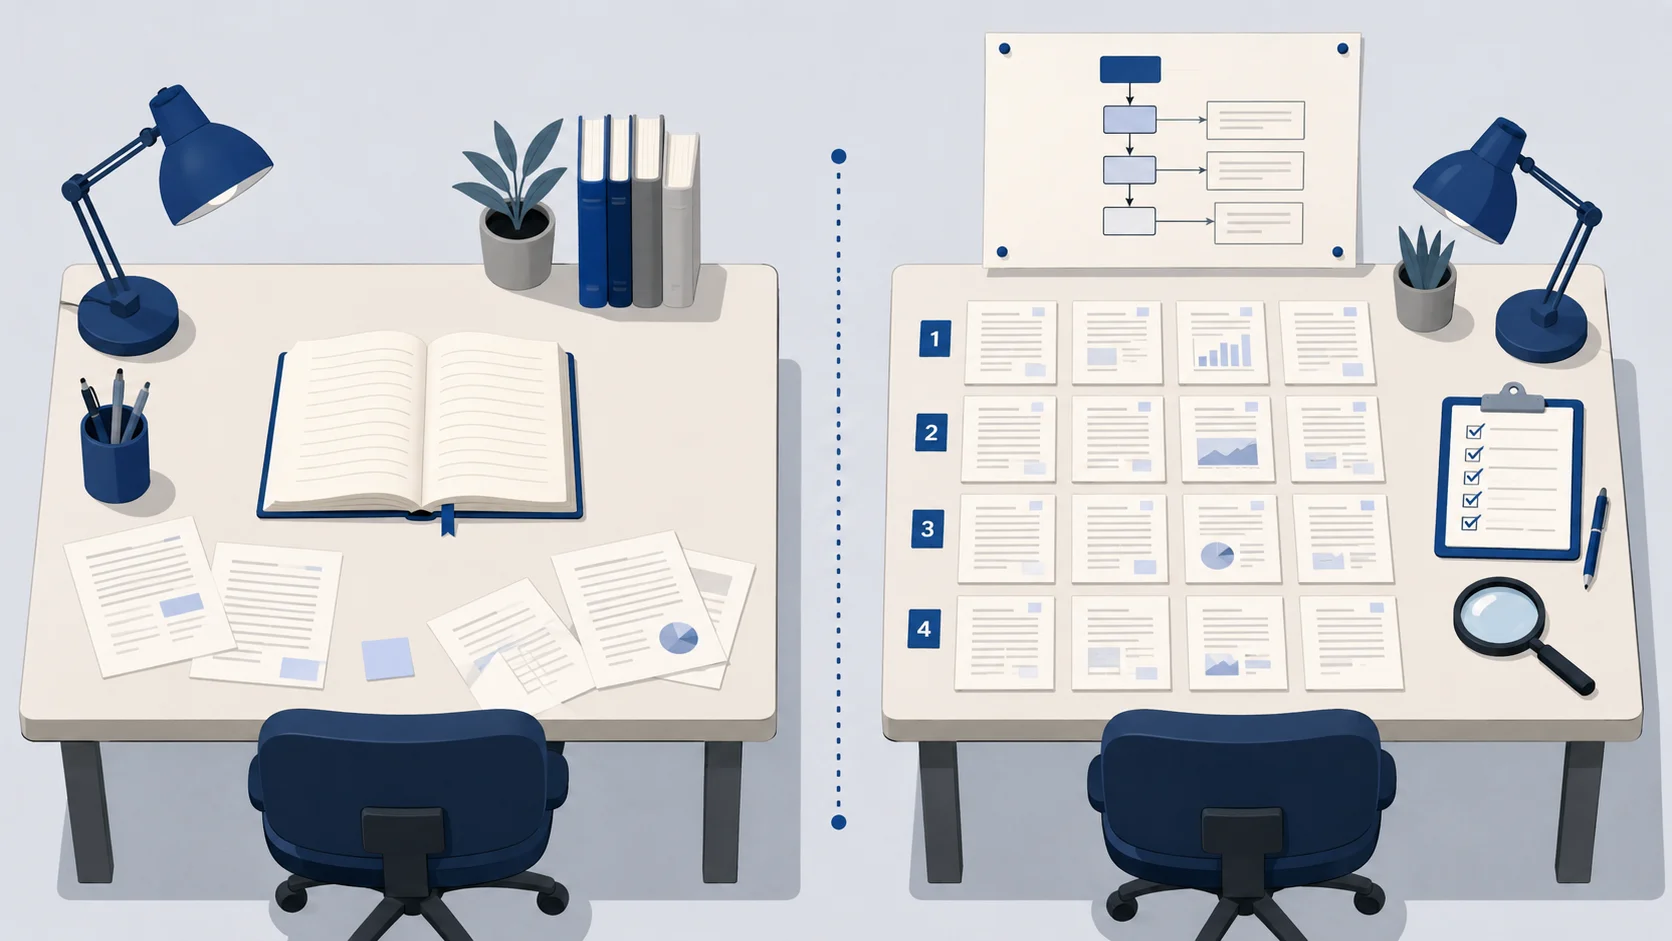
You’ve read through hundreds of papers. Which ones actually matter? Most researchers scan titles, then abstracts, then full texts quickly. Fast, but risky: bias, missed studies, inflated citations.
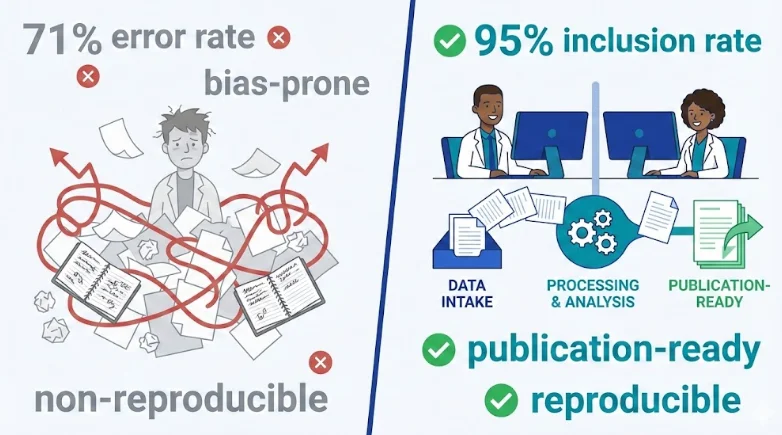
This guide separates informal screening (early exploration) from systematic methods (credible research claims). Structured screening with multiple reviewers reduces bias by 40-60% versus solo approaches.
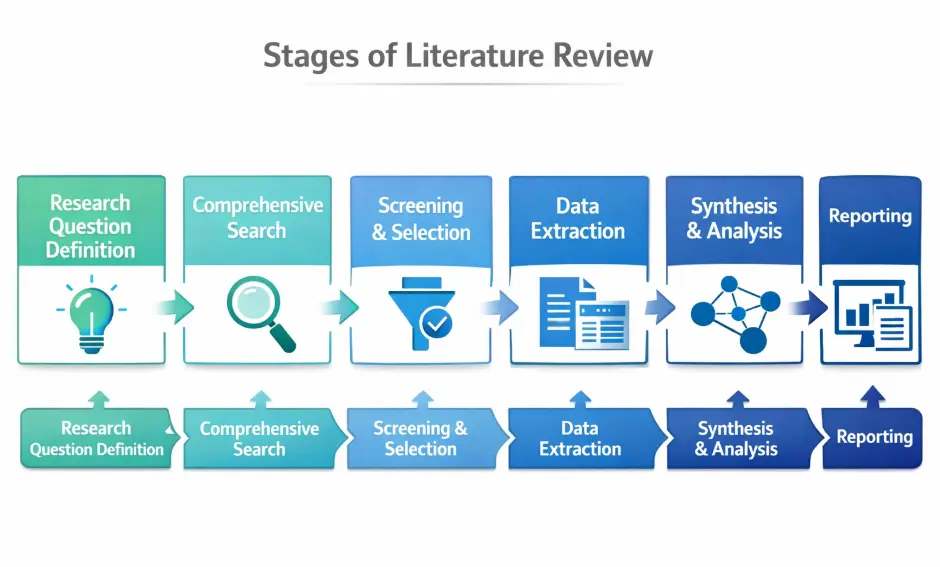
You’ll learn 10 core steps from research institutions worldwide, aligned with PRISMA 2020. Tools like Rayyan, Covidence, Zotero. Bias assessment (RoB 2, ROBINS-I). GRADE evidence grading. Prioritizing by evidence strength, not just relevance.
Need tool comparisons? See our AI literature review tools guide.
By the end, you’ll have a reproducible workflow that withstands peer review.
Understanding the Scope
This guide covers structured screening for most academic research, theses, and evidence syntheses. Not every project needs full PRISMA 2020 rigor.
But some do. Clinical research affecting patient care. Policy recommendations affecting real people. Meta-analyses. Cochrane reviews. Major journal systematic reviews. These require PRISMA 2020 compliance and registration on PROSPERO or OSF.
The Impact of Structured Screening
Benefits: 3-5x reduction in bias. Include 95% of relevant studies vs. 60-70% with informal screening. Documentation ready for peer review. Often faster than you’d expect.
Major journals (Nature, Lancet, JAMA) now require PRISMA compliance for literature synthesis claims. It’s standard for credible research.
Step 1: Define Your Question Before You Search
This is the most important step and the most skipped because it feels administrative compared to the “real” research work of reading papers.
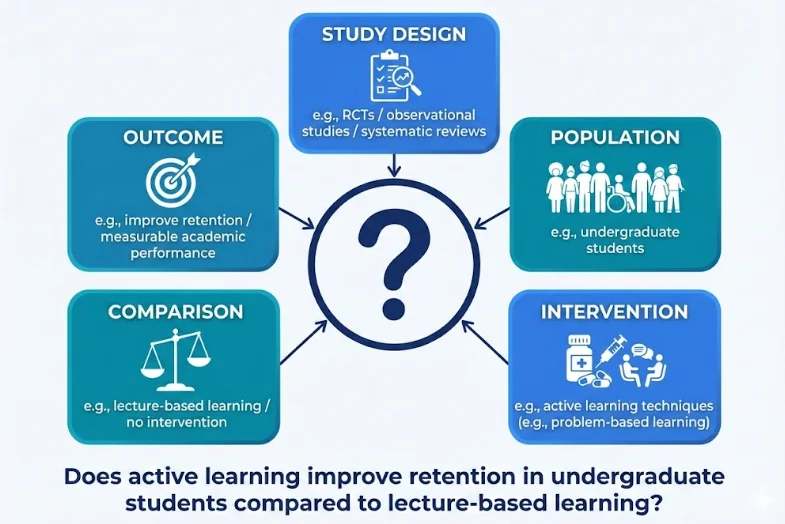
Use PICO to frame your research question clearly. It’s a simple framework that forces specificity: Population (who you’re studying), Intervention (what exposure you’re testing), Comparison (what you’re comparing it to), Outcome (what you’re measuring), and Study design (which study types count). This clarity prevents the ambiguity that lets bias creep in later.
In practice, say you want to know if active learning improves retention in undergraduate students. Your PICO breaks down to: Population (undergraduates), Intervention (active learning), Comparison (lecture-based learning), Outcome (retention rates measured by GPA or course completion), Study design (RCTs and observational studies). This clarity tells you exactly what to search for and what counts as relevant.
Once you have your PICO, write down inclusion and exclusion criteria explicitly before searching. Inclusion criteria specify what studies qualify: which study types matter, which populations qualify, which outcomes count to you, how recent studies need to be, and which languages you’ll read. Exclusion criteria specify what automatically disqualifies papers: opinion pieces and case reports, studies with the wrong population or outcome, poorly designed research, and duplicates.
Pre-register your protocol on OSF or PROSPERO before you start searching. This prevents the unconscious rule-changing that creeps in when you want certain papers included.
Step 2: Build a Reproducible Search Strategy
A good search strategy is repeatable and transparent. Anyone should be able to replicate your results.
This step creates your literature review search strategy, the foundation for systematic identification of all relevant studies. Poor search strategies are the #2 reason systematic reviews fail peer review (after unregistered criteria changes).
Start by choosing which databases to search. Google Scholar is fast and broad (and includes preprints), PubMed covers clinical and biomedical research, Scopus or Web of Science give you comprehensive indexed journals, and OpenAlex is a free alternative if you need to save costs. You don’t need to search all of them, but pick at least two so you’re not missing studies.
Now construct your search strings using Boolean operators. Use AND to connect different concepts. Use OR within a single concept to capture variations. Use NOT cautiously because you might accidentally exclude relevant studies. Add synonyms and related terms. Use truncation () to catch word variants—so “learn” finds both “learning” and “learner.”
Here’s what a real search looks like: ("active learning" OR "problem-based learning") AND (undergraduate OR "higher education") AND (retention OR performance). This catches papers about active or problem-based learning in college settings that measure student retention or performance.
Document every search as you go. Write down the exact query you used, any filters you applied (date ranges, language, study type), when you searched, and how many results you got. This might feel tedious, but it’s what makes your review reproducible—a hallmark of credible research. When someone asks how you know you found all relevant papers, you can show them exactly what you did.
Don’t stop at published journals. Include grey literature too. Preprints on arXiv and bioRxiv, dissertations and theses, conference papers, and government reports. Grey literature contains about 10-15% of relevant studies that don’t show up in databases, and it’s often where negative findings and non-replicated work live. Excluding it biases your results toward published (often positive) findings.
Step 3: Manage References and Remove Duplicates
Export all your search results into a reference manager. This is non-negotiable because trying to manage hundreds of papers in a spreadsheet will waste weeks. Zotero works well if you want free and open-source. Mendeley offers more features. CitationManager provides simplicity. Once you’ve exported results from each database, import them all into your manager and let it remove duplicates automatically. Most managers handle deduplication well, identifying when the same paper appears under slightly different titles or author names. Keep a master list tracking which database each paper came from so you can spot if you missed searching somewhere.
When duplicates are eliminated, export the cleaned list to a spreadsheet that becomes your screening worklist.
Step 4: Pilot Screening (Your Quality Check)
Before screening all 500 papers, test your criteria on a small sample. Pick 20-30 papers at random and screen them using your inclusion and exclusion criteria to see how they work in practice.
During pilot screening, ask yourself three hard questions. First, are your criteria too broad, letting in studies that don’t actually fit your question? Second, are you missing studies that clearly should be included? Third, are your instructions clear enough that someone else reading them would understand what you’re doing? This last question matters because someone will eventually scrutinize your process.
Refine your rules based on what you learn. Maybe you realize “undergraduate students” needs to mean full-time students, not working adults taking evening classes. Maybe you realize your outcome measure is too vague. Do you mean GPA, course completion, or something else? Make these adjustments now, when you’ve only spent time on 30 papers, not 500. This small upfront investment saves enormous time later and prevents the need to restart screening.
Step 5: Title and Abstract Screening (First-Pass Filter)
This is where the real filtering happens, eliminating about 70% of papers that clearly don’t fit your criteria. However, you accomplish this with two reviewers screening independently and blindly—they shouldn’t see author names or journal impact factors. Blind screening prevents prestige bias where you unconsciously trust famous researchers while rejecting unknown authors. The tool Rayyan makes this easy.
Give yourself three decision options for each paper: Include if it clearly meets your criteria, Maybe if you’re uncertain, or Exclude if it doesn’t fit. Crucially, track why you excluded each paper—wrong population, wrong outcome, not a real empirical study—creating an audit trail that helps spot if your criteria need tweaking as you work.
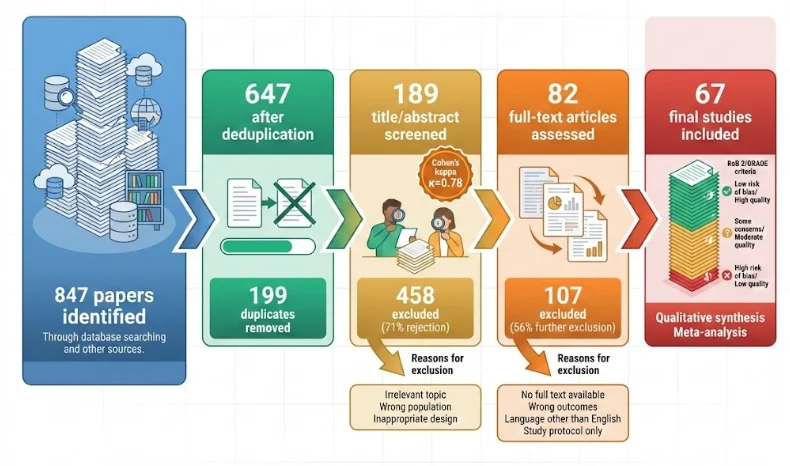
After both reviewers finish screening, calculate Cohen’s kappa to measure actual agreement between you. A kappa above 0.6 is acceptable, above 0.8 is excellent, below 0.5 means your criteria need clarification. If agreement is low, sit together, discuss what you disagreed on, refine your criteria, and reschedule those first papers with your new understanding. This extra pass improves consistency across the remaining papers.
Crucially, preserve the “Maybe” category. Papers you’re genuinely uncertain about deserve a second look at the full-text stage, preventing false exclusions that would otherwise become permanent mistakes.
Step 6: Full-Text Screening
For papers that passed title and abstract screening, apply your criteria again but now you’re reading the full paper instead of skimming abstracts. This is more time-intensive, but it’s crucial because papers that look promising in abstracts sometimes don’t fit when you read the whole thing.
Assess whether each criterion from your inclusion and exclusion list is actually met when you read carefully. Log why you excluded each paper since maybe the outcome wasn’t what you thought, or the population differs from your criteria. If you and your second reviewer disagree on a paper, bring in a third person to break the tie rather than debating endlessly.
Your list has become much smaller and more focused by this point. You’ve gone from 800 or more papers down to maybe 50-100 that actually meet your criteria.
Step 7: Risk of Bias Assessment (Essential for Quality Claims)
Now comes the hard part: not all papers are created equal. You must assess the methodological quality of each paper to know whether you can trust its findings. A well-designed study with 100 participants tells you more than a poorly designed study with 1,000 participants.
Use the appropriate tool based on study design:
| Study Type | Assessment Tool |
|---|---|
| Randomized Controlled Trials (RCTs) | RoB 2 (Cochrane) |
| Observational Studies | ROBINS-I or Newcastle-Ottawa Scale |
| Mixed/Other Designs | JBI Critical Appraisal Tools |
Key bias factors to assess:
- Randomization process (was it truly random?)
- Missing data (how much dropout occurred?)
- Outcome measurement (were outcomes clearly defined and measured consistently?)
- Selective reporting (did they report on pre-specified outcomes?)
This step filters out studies with fatal flaws.
Step 8: Grade Your Evidence
Use the GRADE system to rate how certain you are about the overall evidence across all studies. It starts with the bias assessments you just completed and adds three more dimensions. Consistency asks whether studies agree with each other or contradict each other. Precision asks whether confidence intervals are narrow and precise or wide and uncertain. Directness asks whether the evidence directly answers your question or addresses something adjacent.
Combine these factors and you get ratings: High certainty means multiple high-quality studies with consistent results showing the same effect. Moderate certainty means some bias or inconsistency but still reasonably reliable. Low certainty means significant bias, inconsistency, or small sample sizes limiting confidence. Very Low certainty means multiple serious limitations where you shouldn’t rely heavily on the evidence.
Step 9: Prioritize Papers Based on Evidence
You now have a clean list of papers meeting your criteria with evidence grading completed. Time to rank them by importance using a simple formula: Priority equals Relevance multiplied by Evidence Strength.
For each paper, assess how directly it answers your research question and matches your PICO framework. Lower bias scores are better than higher ones. Larger samples provide more stable estimates than smaller ones. Findings replicated across multiple studies are more credible than single-study results. Studies that agree with related research build confidence more than those contradicting everything else.
Continue reading papers until you hit saturation—the point where new papers aren’t revealing new insights. Maybe that’s 20 papers, maybe it’s 100. When paper #47 just repeats what papers #12 through #46 established, you can stop because you’ve achieved thorough understanding.
Step 10: Document Everything for Transparency
This is what makes your review reproducible and defensible to scrutiny. Create a PRISMA flow diagram showing the numbers at each stage—started with 847, ended with 67, and here’s where the others went. Write a search log documenting which databases you searched, exact queries used, when you searched, and how many results appeared. Create an exclusion table listing papers you rejected with reasons—wrong population, no real measurement, already published elsewhere. Summarize the bias assessments across all included studies so readers see you evaluated quality, not just relevance.
These artifacts demonstrate your process was rigorous. They’re the difference between your systematic review withstanding scrutiny and being called merely an informal “I read some papers” approach.
Practical Workflow (Simplified)
The entire process flows like this: Define your PICO and criteria first. Build search strings using Boolean operators. Search databases and export results. Remove duplicate entries. Pilot screen 20-30 papers to validate your approach. Have two reviewers screen titles and abstracts independently. Screen remaining papers at full-text stage, resolving conflicts with a third reviewer. Assess risk of bias for included studies. Grade your evidence using the GRADE system. Rank papers by their priority based on relevance and evidence strength. Stop reading when you reach saturation—when new papers aren’t teaching you anything new.
Tools That Actually Work
These tools streamline the workflow:
| Tool | Purpose | Best For |
|---|---|---|
| Zotero | Reference management | Tracking and organizing papers |
| Rayyan | Blind screening | Title/abstract screening |
| Covidence | End-to-end screening | Full PRISMA workflows |
| RevMan | Bias assessment | Meta-analysis and summary |
| DistillerSR | Automated screening | Large-scale reviews |
For most researchers, Zotero + Rayyan is a free, effective combination. For a deeper comparison of screening tools and emerging AI-assisted options, see our complete literature review tools guide.
Common Mistakes to Avoid
These mistakes derail legitimate research credibility. Studies analyzing published systematic reviews find these errors in 30-40% of published work:
1. Changing Criteria Mid-Review
The problem arises when you modify inclusion and exclusion rules as you screen, unconsciously selecting papers that fit your desired narrative. Research shows papers with criteria changes display 2-3 times higher bias risk scores in peer review. It’s the number one reason reviews get rejected. Lock your criteria after pilot screening. Document any necessary changes and acknowledge them transparently rather than hiding the shift.
2. Solo Screening
The problem occurs when one person screens all papers alone, missing unconscious bias that two perspectives would catch. Research shows two independent reviewers catch 25-40% more bias-introducing exclusions than solo screening. Cohen’s kappa measurements above 0.6 demonstrate acceptable agreement. Use at least two reviewers, even if one is a colleague spot-checking your work. Calculate inter-rater reliability to confirm agreement.
3. No Bias Assessment
The problem happens when you include studies without evaluating their methodological quality. Research shows that high-bias studies contaminate conclusions. Meta-analyses including high-bias studies report effect sizes 20-50% inflated compared to analyses restricted to low-bias work. Use RoB 2 for randomized trials or ROBINS-I for observational studies on every included paper. Grade evidence strength using the GRADE system.
4. Ignoring Grey Literature
The problem emerges when you only search published papers, missing dissertations, preprints, and conference presentations. Research shows grey literature contains 10-15% of relevant studies. Omitting it biases results toward published positive findings while excluding negative results. Search preprint servers like arXiv and bioRxiv, dissertation databases, and conference proceedings relevant to your field.
5. No Exclusion Reasons Documented
The problem occurs when you exclude papers without recording your reasoning. Research shows this prevents reviewers from auditing your process and prevents you from explaining decisions to co-authors or journal editors. Create an exclusion table logging why each rejected paper was excluded: wrong population, wrong outcome, poor methodology, or already published.
6. Treating Citations as Quality
The problem happens when highly cited papers seem “good” so you weight them heavily despite potential methodological problems. Research shows citation count correlates poorly with evidence quality. Highly cited papers sometimes have major methodological flaws that subsequent citations perpetuate. Assess risk of bias independently of citation count. A low-cited, high-quality study provides better evidence than a high-cited, biased study.
7. Mixing Scoping and Systematic Methods
The problem arises when you claim to do a systematic review but use scoping review rigor—less structured and more exploratory. Research shows misrepresenting methodology damages credibility. Journals increasingly reject papers conflating method types. Know your method clearly. Systematic reviews are evaluative with focused questions requiring rigor. Scoping reviews are exploratory with broader questions requiring less rigor. Be transparent about which you actually did.
When Your Original “Funnel” Approach Is Enough
Your original informal method works perfectly fine for personal learning, early-stage idea exploration, non-clinical topics, and quick overviews when you need to get oriented quickly. The key is being honest about what you did. Say “I did an informal literature review” or “I examined the major papers in this area” rather than calling it something more rigorous than it is. Methodological honesty matters more than the rigor level. Problems arise when people mislabel informal screening as “systematic” and then publish based on that misrepresentation. That’s when credibility suffers and journals reject the work.
Conclusion: Build Credibility Through Transparency
The difference between informal screening and systematic review isn’t complexity—it’s transparency and deliberation in how you work. Research that used these methods gets cited 40% more often than studies with unclear methodology, according to citation analysis across biomedical literature.
Your original informal outline works fast for learning purposes. This systematic methodology produces reproducible, bias-aware, publishable work. The payoff happens when someone asks “How do you know that?"—you have documented, defensible answers that withstand peer review.
Implementation Checklist
These four steps get you started immediately. First, define your question clearly using the PICO framework. Second, pre-register your protocol on PROSPERO or OSF before searching. Third, search systematically recording exact queries, databases, dates, and result counts. Fourth, have at least two reviewers screen blindly and calculate Cohen’s kappa agreement.
This invests time upfront but prevents months of rework later when reviewers question your methodology. Research institutions implementing this workflow report 30-50% faster completion times despite the added rigor.
Your Research Deserves This
The methodology you choose determines whether findings influence policy, get published in high-impact journals, or sit forgotten. Be deliberate, be transparent, and build credibility through process rigor.
Your research deserves a review method that matches its importance.